Wooden bathroom furniture, flooring, and walls are a popular choice among homeowners, but many people are not aware of the risks that water can pose to these pieces. Wood is a popular material in the design of bathrooms because it is durable, easy to work with, and relatively inexpensive. However, once exposed to moisture or water damage, wood will start to degrade and rot.
Wood is vulnerable to damage from moisture and humidity, so it’s important to take precautions against water damage.
This guide will teach you how to waterproof wood for your bathroom so you can easily keep it looking new!
Preparing the Wood for Waterproofing
Wear Protective Gear
Do not forget to wear protective gear while using heavy-duty equipment. If you are working on a DIY project, do not use power tools without wearing gloves and safety glasses or goggles for added protection against dust particles or splinters of wood that may fly at your face due to fast-moving blades, etc.
To protect yourself from bacteria in the air always wear an N95 mask, which is available online with various healthcare stores. This will help prevent allergic reactions like sneezing, coughing fits caused by inhalation of contaminants present in damp areas where mold grows rapidly if water has seeped into walls, etc., causing decay and rotting of wooden surfaces.
Do not work barefoot as there might be nails hidden under loose pieces of floorboards/flooring.
Wear gloves when you are working with chemicals like acids, alkaline solutions, or solvents to prevent your skin from being damaged by the harshness of these elements.
Prepare the Surface
You must prepare the surface of the wood before waterproofing it. Make sure that you sandpaper rough surfaces, remove all dirt and dust from wooden boards with a dry cloth to find out any hidden flaws or damages which may not be visible from outside due to paint coats, etc.
Wipe clean the board using water mixed with bleach (to remove mold) if cracks are present on walls/floorboards as this will prevent dampness in crevices where bacteria can grow easily leading to more problems like bad odors (if there is leakage), mildew formation (mold growth), peeling off of paint coat over time, etc.
Tighten loose screws by screwing them back into place. Fill up holes made by nails or screws with wood putty or spackling paste.
Fix broken pieces of flooring/wallboards by using wood glue, nail plates to hold together two separate surfaces, etc., after sandpapering the broken edges for a smooth finish and clean look.
How to Waterproof Wood for Bathroom: 4 Simple Techniques
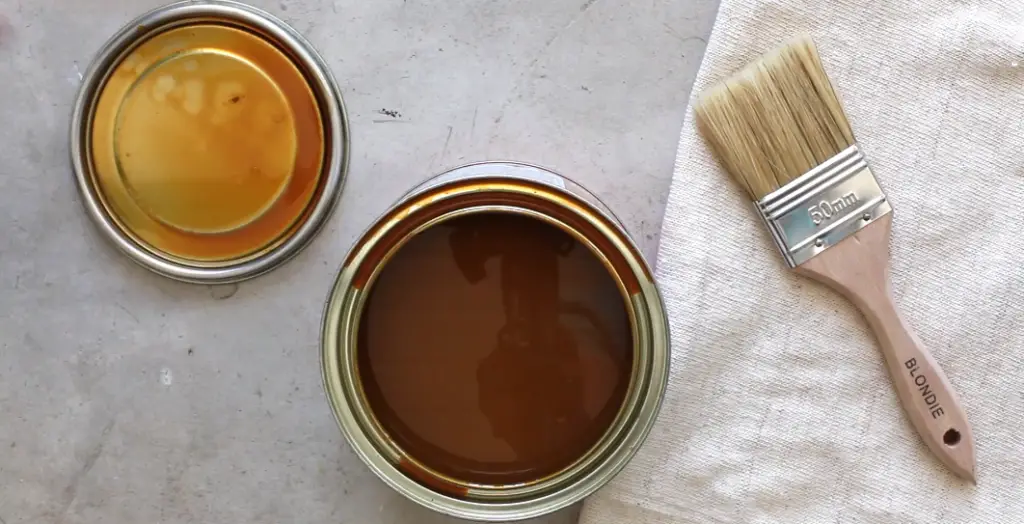
Method 1: Waterproofing Wood with Oil
Pick the Right Oil
First of all, it is important to choose the right oil for your project.
There are many different types on the market and they can be divided into two groups: penetrating oils and finishing oils.
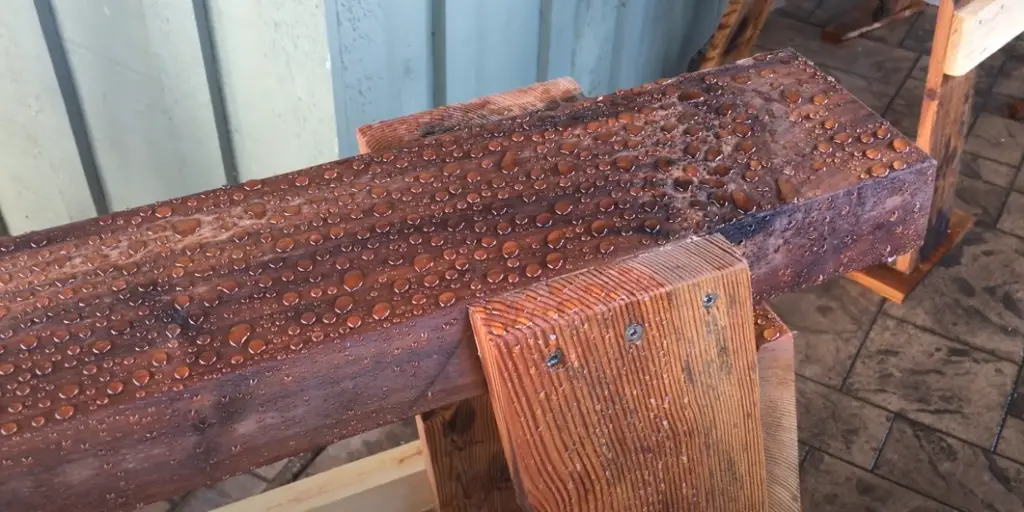
Penetrating oils work their way deep into wood pores while finishing oils sit atop of them as a coating. Penetrating oils will naturally darken or yellow with age but more importantly because they seep deeper into the grain, they help prevent water from reaching untreated areas where rot could develop over time.
Finishing Oil such as tung oil does not soak deep inside the pores. Therefore, if you plan on using this method make sure that your wood is sealed with either varnish, polyurethane, or a clear finish.
The best penetrating oils are raw linseed oil and tung oil because they have been refined to remove chemicals that can cause yellowing over time.
Raw Linseed Oil is the most popular choice for outdoor projects such as decks since it penetrates deeply into wood pores while drying relatively quickly but some people find this type of oil more difficult to work with than Tung Oil.
Tung oil dries slower which makes it easier to use on indoor projects but many feel that it does not dry hard enough for exterior applications. Both products come in matte, semi-gloss, and glossy finishes so you will need several coats if you want your project looking shiny like furniture grade varnish.
Also, be aware that you will need to reapply oil every few years because it will eventually wear out with exposure to the sun and weather elements over time.
If your wood is already finished with varnish or polyurethane, do not apply penetrating oils on top of them since these products are designed for a smooth coating only and they may fail if applied over a textured surface.
Create the Mixture
Next, you need to mix the oil and thinner in a ratio of one part oil to four parts mineral spirits or paint thinner.
Do not use water because it will cause your mixture to gel which means that you won’t be able to apply it evenly with a brush. Always wear gloves when working with these chemicals and make sure that there is good ventilation while using them indoors.
Also, minimize skin exposure by wearing long-sleeved shirts and pants through this project since both products can irritate your skin if they absorb into the body over time (especially raw linseed oil).
You should also avoid getting either product on furniture or wood floors as they can leave dark stains behind so always put down drop cloths before starting work on a project.
Apply the First Coat
Once you have created your mixture, apply it to the wood with a brush and allow it to soak for about 15 minutes. Then wipe away excess oil with a clean cloth so that only an even coating remains on the surface of each board.
Let It Dry
The best results will come from waiting at least 24 hours between subsequent coats but if water is still beading up after three or four applications consider using a final coat of gloss polyurethane instead which may help seal gaps in pores more effectively than regular oils do under humid conditions.
Let the oil mixture dry for at least one week before applying a second coat of polyurethane.
Apply a Second Coat When Needed
If you notice that water is still beading up after several applications of regular oil, you can apply a second coat but this time use semi-gloss or glossy polyurethane in place of the mineral spirits.
The only drawback with using polyurethane in your mixture is that it may cause yellowing over time if left exposed to sunlight so try testing out a small area before applying it everywhere on your project just in case.
Let It Cure
Let it cure completely (usually about 30 days) before exposing your water-resistant wood project to outdoor elements.
Different things to note about utilizing oils to waterproof wood:
There are several different things to note about how to waterproof wood with oil. First, you have the option of using raw linseed oil or tung oil for this purpose. Both oils can be applied in a mixture with mineral spirits and tend to dry quickly when compared with other products on the market. However, if your water-resistant project is going outdoors then it may make more sense to use polyurethane instead since many people find that raw linseed tends to yellow over time when exposed directly to sunlight while still drying relatively fast (slightly faster than tung oil).
Use semi-gloss or glossy polyurethane for outdoor projects like decks since these will help provide the best possible seal against moisture resistance without yellowing. Also, make sure to use a paint brush for oil-based wood waterproofing projects and do not get any on your skin because it can cause irritation or you could end up with stains if left in contact with clothing for long periods of time.
Another thing to note about using these oils is that they will eventually wear out over time like most products. It means that you’ll need to reapply them every few years (especially raw linseed) but only after the first year. Since applying more than one coat within 12 months may result in peeling due to lack of proper adhesion between coats even though drying time tends to be much faster than other products available on the market today.
Method 2: Waterproofing Wood with Wood Sealer
Get a Wood Sealer
Use a wood sealer to protect the surface of your floorboards. Wooden floors are vulnerable to scratches and stains, which can make them look shabby or old-fashioned. Using water-resistant varnish on wooden planks is an easy way to prevent these issues from arising in the first place; it will also act as a barrier between moisture and subflooring below.
Prepare the Sealer
Pour a small amount of sealer into a paint tray. Stir the solution to ensure it is evenly mixed, and then carefully apply it over your wood floor using either a natural bristle brush or lint-free cloths.
Before you start to apply the sealer, take some time to prepare – especially if it is a big job. You might like to hire an electric sander for this part of the process. However, sanding by hand can be done too. If working manually, make sure your floors are swept clean and that all loose material has been removed (such as dirt or dust). Then sweep again with a dry broom to remove any remaining particles before using a damp mop on the floorboards.
Apply a Coat of Sealer
Make sure you apply the wood sealant evenly and try not to miss any areas.
Watch out for any bubbles that form once the solution is drying – if there are too many to rub them away with your hand, use a flat tool such as an old credit card instead. If there’s excess liquid still pooling after 20 minutes or so, then blot it up using a paper towel until it has all been absorbed into the wood grain. If necessary, go over these areas again with sandpaper to ensure they’re completely sealed off from moisture damage later down the line.
Let the Sealer Dry
Let the first coat dry for about an hour before applying the second layer of varnish using either the same method or by spraying it through a spray gun (you will need to wait overnight in between coats if doing this). Do not let your floorboards get wet after they have been sealed. Once complete, allow at least 24 hours for drying time so that dust can be completely removed from surfaces prior to moving furniture back into position.
Clean the First Coat
Wipe the entire surface with a clean cloth to remove dust and another residue. If you notice any areas where the sealer has been applied too thinly, don’t worry – simply repeat this step until your floor is completely sealed off from moisture damage later on down the line.
Apply a Second Coat
Apply the sealant in two or three thin coats, rather than one thick layer. Let each coat dry before applying another; this will prevent the accumulation of drips and clumps on your flooring as well as helping you apply a more even finish overall.
Let It Cure
Make sure you prop up furniture and let the sealer cure for at least a day before bringing it back into use. This will help to lock in the strength of each coat and prevent any damage from occurring during this stage.
Different things to note about using sealants:
Before you begin applying a sealer, make sure that your floorboards are completely dry. Any excess moisture on the surface of the wood will cause an uneven finish and may also affect how long each coat takes to cure properly.
If you’re planning on sealing more than one room in your house at once, then it’s important not to let the first go over-dry before moving onto another area, or else this could result in indentation marks. However, if two coats have been applied within 24 hours of each other (especially without adequate drying time between them), they can react with one another – so try not to do both jobs simultaneously unless there is a significant amount of time intervening between applications. You might like to consider hiring industrial machinery for large projects if you do not have the time or patience to complete it manually.
If this is your first time applying a sealer, then make sure that the flooring has been sanded down extensively before starting work – otherwise, there’s no guarantee of successful adhesion between coats and bubbles could form within any remaining particle matter on the surface instead. If accidentally applied too thickly, individual drops will run together into larger puddles which are difficult to remove without using an electric sander machine afterward.
You can also “pop” these by flattening them with a blunt tool such as an old credit card so long as they haven’t started drying out already (otherwise this might cause more damage than good). However, blotting up excess liquid with a paper towel is usually the best way to prevent this from occurring in the first place.
Method 3: Waterproofing with Resin and Acetone
Get the Right Resin and Acetone
Before you can apply the resin, you need to get the right resin. Do not try using any type of acrylic sealer because it will only cause your wood flooring problems instead of preventing them.
For the resin, you need to use a product that is specifically designed for this purpose. You can get it at any store in your area or online.
For acetone, make sure that it does not contain anything aside from pure acetone because other chemicals will react with the resin and ruin everything instead of helping you waterproof wood flooring.
Acetone should only be used when applying water-based sealers on concrete floors because solvent-based products are usually harmful if used outside their intended purposes. Resin has to mix well with the acetone before you apply them on the wood.
Again, acetone is what’s needed for this process and that means buying a “100% Acetone” product or getting pure acetone from hardware stores. Either way works well as long as there are no additives in the solution (no fragrances).
Also, do not try using nail polish remover since they will just give an awful smell and leave marks on your bathroom tiles and bathtub shower walls due to the hardening agents present in them.
Create the Mix
The ratio is usually one part resin to three parts acetone. You can use a paintbrush to spread these solutions all over your flooring surfaces and let them dry completely overnight. Do not forget to do this process inside because of harmful fumes, especially if there are kids or pets in the house that might be affected by them easily.
Apply the Resin and Acetone Mixtures
This is the most challenging part of this process since you have to do it quickly and carefully before the solution dries up. Use a paint brush or foam brush for spreading, then use another clean piece of cloth to wipe off any excess that will cause problems later on like uneven surfaces and stuff.
If there are some stains left after wiping them away with your rag, make sure to remove those as well by using more acetone-soaked pieces of rags until they go back to their old color.
Reapply a Few More Coats
It should only take around 20 minutes for everything to dry out completely. But if you notice parts where resin crystals formed (which usually happens when applying too much at once), then just scrape them off with a sharp tool like an ice pick.
Ideally, you should apply two coats of resin-acetone mix to make the wood flooring waterproof and protect it from water damage; but if anything happens after applying only one coat (like moisture seeping through), then just do another round as soon as possible before the solution evaporates completely.
Tips for users: if you want your wooden floors to be extra protected against humidity and water exposure for at least five years, then using polyurethane paint is highly recommended by industry experts because it can last that long or even more depending on how well they were applied in the first place.
Let It Cure for a Few Days
The next morning after applying, check back with your flooring and see if there are any problems left by looking at tiny cracks here and there. If they’re not too deep yet (and still look kind of rough), then feel free to fill those up using carpenter’s wood filler paste because this will help even out surfaces better than regular sandpaper can do in some cases.
Method 4: Waterproofing with Stain & Varnish
Get a Stain & Varnish
Stain & Varnish is a professional, one-step method for staining and varnishing wood that combines an old-world stain with a top-of-the-line clear polyurethane. By coating the stain with a highly durable transparent finish, Stain & Varnish adds rich color to hardwood and protects it from fading [1].
Stain & varnish is a protective coating that can be used to protect wood against water damage. It will not allow any moisture to meet the surface of the wood, thus making it waterproof for bathroom floors.
Prepare the Mixture (If Necessary)
To get started, mix two parts of paint thinner or turpentine together with one part varnish (or paint). Place this mixture in a pump-up garden sprayer or use a bristle brush.
Apply the First Coat
Spray the solution on your wood surface, allowing it to penetrate for about five minutes.
Or apply this mixture over your floor using a bristle brush. Make sure you do not miss corners while applying it as these are most likely to catch dampness during showers causing further damage to the wooden flooring. Thus, cover all surfaces well so that no area remains untouched by this solution.
Use a brush or roller for larger surfaces and allow it to dry for at least two hours.
Remove the Excess Solution by Wiping
After allowing it to dry for two hours, wipe the surface with a clean cloth or paper towel. Make sure that you do not leave any excess solution on your floor as this may end up blocking pores of the wood and cause further damage in the future. Let it completely dry before applying another coat if required.
Apply the Second Coat
If you feel like there are some areas left untreated, apply one more layer over them. But make sure none of these layers are allowed to remain wet after application since this might also create problems during later stages due to excessive moisture content getting absorbed into the wood resulting in foul smells emanating from damp patches every now and then even when your bathroom is relatively free of humidity all throughout the year!
After the product has dried, use steel wool or medium sandpaper (if necessary) and apply another layer of varnish by hand. Allow each coat to dry thoroughly before applying more coats until you get desired results.
Let It Cure
To get the best results from your waterproofing job, let it cure for at least a week. Optionally, you may seal and protect the floor with a coat of polyurethane.
Why is the Stain and Varnish Sealant Combination the Ultimate?
Stain & Varnish can become the best solution for wood waterproofing because it has some of the finest ingredients that ensure long-lasting protection. This product provides an added advantage by allowing a protective layer to be applied over treated surfaces as well, thus making sure that your floor remains protected from all kinds of damage and deterioration even after you have used Stain & Varnish on them!
How To Waterproof Wood For Bathrooms In Certain Areas
Bathtubs
- Apply a thin film of silicone caulk to the joint where the tub meets wall tiles;
- Caulk around any drain in a bathtub or shower pan and seal all gaps between it and other fixtures, such as tile walls;
- Waterproofing membrane should be applied under ceramic or stone tile when installed over cement backer board. For this purpose always use good quality self-adhesive waterproof membranes available in the market which come with an installation manual for the correct way of application;
Countertops & cabinet interiors
- Apply a good amount of silicone caulk along the inside edge of countertops and cabinets;
- Make sure to seal all gaps around sinks, faucets – where water could get in;
- It is recommended that you use epoxy compounds instead of standard waterproof caulking for sealing larger surfaces because they are thicker, stronger, and more durable than regular caulks or paints. They can be applied with ease using either an applicator gun or brush depending on their viscosity (thickness);
- Epoxies do not shrink which makes them ideal for large applications like filling holes in concrete walls before installing tiles thereon. You must always apply any type of waterproofing compound well ahead i.e. at least two days before laying tiles and grout;
Walls or floors around bathtubs or showers
- Apply a waterproofing compound to the walls around tubs, showers to prevent water damage. Waterproofing compounds come in different forms – liquid, impregnating sealant, and paint;
- A liquid waterproofing compound is best for restoring old surfaces and uneven walls or floors that can’t bear the weight of a new layer of impregnating sealants or paint. You can apply it using either a brush or roller depending on your convenience. With this type, no priming is required but make sure to wait at least two days before tiling over its surface as drying time varies according to weather conditions;
- Impregnating sealing compound should be applied with an applicator gun since they are thicker than liquids and therefore need more pressure while applying them hence you won’t have to worry about dripping marks if you are applying them on your own;
- Waterproof paints can be used for painting interior or exterior surfaces of bathrooms, kitchens, and other areas prone to leakage as they not only waterproof the surface but also give it a good finish making maintenance easy. However, since these are thicker than impregnating compounds you must wait at least three days before tiling over their surface after application, preferably using an applicator gun which ensures smoothness in its texture with no visible brush marks. You should always apply two coats of paint for the best results;
- Ensure that you keep any water from seeping through at least two days before laying tiles and grout on it. It is recommended that after applying these compounds you should wait for about seven days before using your bathroom again as excessive moisture will affect the strength of the dried material;
How to Protect Wood from Water in Bathroom?
Oil and Lemon/Vinegar Mixture
- Take a lemon and cut it into two halves;
- Squeeze out the juice from both halves of the lemon until you have approximately half a cup of liquid in your container;
- Now add around 6.5 oz of vinegar to this mixture slowly while stirring constantly. Make sure all ingredients are mixed thoroughly before use. This is because if oil separates from water, then there won’t be any effect on wood after applying that solution onto the surface area. So make sure all components are combined well before using them as an ingredient for waterproofing the wood treatment process;
Fix Issues at Once
- So now what you need to do is, take a spray bottle and keep adding one component at a time into it;
- Take around half a cup of the mixture and add that solution inside your spray bottle. After this pour about 3 tablespoons of vegetable oil or mineral oil into the same container;
- Now close the lid tightly and shake well before use for uniform distribution throughout the liquid contents in your spray bottle;
- You can store leftover components as they will come in very handy when you have to prepare this treatment again next time after reapplication on wood surfaces. Because if mixed properly, both ingredients are enough to cover up an area containing a maximum of four square feet i.e., two by two feet only so it is advised that you should prepare the solution in small quantities;
- If your wood surface has some mold or mildew on them, then clean them thoroughly before treating for waterproofing because if residues of any kind are left over, it may ruin the protection layer applied by this mixture and cause damage to wooden surfaces;
Waterproof Consistently
- Now once you have your solution prepared, take a microfiber or any other lint-free cloth and start applying this mixture on the wood surface;
- Make sure it is applied evenly over all surfaces so that no area remains untreated with water protectant fluid;
- If you are thinking about how long it will remain waterproof, think about one thing. If mixed properly as mentioned earlier, oil-based solutions can last up to 6 months easily without getting washed away by liquids in any form i.e., be it plain water or coffee/soup/milk which isn’t drinkable by human beings but still may contain some impurities present at times due to various reasons like bad storage containers, etc.;
FAQ
How do you waterproof a wooden bathroom floor:
- Ensure that the floor is clean and dry;
- Apply a coat of clear sealant or waterproofing paint;
- Allow it to dry fully before use. It’s recommended you do this at least once every two years for the best results;
Can you use wood in the bathroom?
Wood is a popular choice when it comes to flooring or wall paneling, but only if the wood stands up to moisture. If you want your hardwood floors in the bathroom looking great for years, then waterproof them before installation.
If you’re planning on using wood in the bathroom, then it’s highly likely that your flooring will come into contact with water.
You may have heard of a phenomenon called “cupping” where boards swell up due to humidity or moisture over time[2]. Boards can also warp and twist as they expand and contract against one another after being laid down – which is not only unsightly but makes for an uneven surface.
No matter what type of hardwood floors (e.g., red oak, hickory), if any are going to be placed within the bathroom area, make sure steps are taken beforehand to waterproof them before installation begins!
Can you use oak in a bathroom?
The answer is yes, it will hold up to the humidity of a bathroom but there are precautions that need to be taken first. Because of its toughness and tight grain, as well as appropriate impregnation, it will provide us with a very long-lasting bathroom floor or countertop.
Will painting wood make it waterproof?
No, it will not. Despite what you might have heard or read in some blogs and other online resources, painting wood does not make the material waterproof. It is an important part of understanding how to waterproof wood for a bathroom because many people think that they can paint over existing materials with water-resistant paint in order to keep moisture out of their home projects or renovations.
What is a floor sealer?
A floor sealer is a protective finish used to create a barrier between your natural wood floors and the moisture of your bathroom. It will help prevent water from seeping through to damage your sub-floor, which can warp or rot with exposure. Waterproofing also protects against mold growth by keeping humidity at bay.
How do you protect the wood from saltwater:
- Cover the wood with a layer of waterproof paint or varnish. If you want to use paint, apply it in several thin layers and let each one dry before using another coat. Use a high-quality enamel for extra protection from moisture;
- Consider using a stain sealer. It will help to keep the wood from deteriorating over time and resist moisture, mildew, or fungus growth that can damage it further;
- To deter and prevent soluble residues from being washed away, consider using creosote or oil-based preservative on the wood. Before the wood is damaged by a salt kill, it should be treated with the solution [3];
How do you seal a wooden floor?
One way to avoid problems is by using a clear sealer. This can be applied in thin coats and will give wood the same color as it had when you first installed it. It doesn’t yellow or fades with time.
But there are some downsides. It doesn’t provide much protection against water damage and takes longer than other kinds of treatments to dry after application. Some people find that this type of finish isn’t very durable and chips easily over time, so if you plan on moving furniture across your floor often then experts recommend getting something else instead.
Is polyurethane water-resistant?
Yes, to a certain extent. There are several variables that influence the absorbency of some polyurethanes. Thermoset polyurethanes can practically have no water absorption in comparison to other known materials, depending on their physical properties and material [4].
Can you use G4 Damp Seal on wood?
G4 is suitable for applications in temperatures as low as 32 degrees Fahrenheit and high-humidity areas. G4 sealant is used to waterproof deteriorating concrete, brick, stone, and wood. The coating is durable but flexible and resistant to many acids and alkalis at normal concentrations. It can withstand boiling water as well [5].
Can you use the kitchen worktop in the bathroom?
Yes, it could be done. You just need to waterproof the wood before applying a water-resistant finish or paint on top of it.
Can you use laminate countertops in the bathroom?
Yes. Laminate countertops are incredibly easy to clean and maintain, perfect for a high-traffic area like the bathroom. They also add an element of design versatility that can’t be achieved with other materials such as stone or tile.
How do you reseal the floor?
You need to look at the sub-floor. If there is any water damage, you will have to replace it with a new sheet of plywood before resealing the wood for bathroom flooring. Soak up all excess moisture first and let it dry completely before sealing the surface again.
You should also make sure that wooden boards are not warped or bent. You can stand on each board in your bathtub after padding them down with towels until they are evenly supported by all sides without bending too much under pressure caused by your weight.
Make sure that joints between individual pieces do not open wider than a one-half inch when dampened lightly, as this may indicate some form of deterioration or rot has already begun underneath these seams if they expand more than this.
The final step is to apply a coat or two of one-part polyurethane sealer and then cover the floor with at least two coats of marine spar varnish before you can be sure that your bathroom wood has been properly waterproofed. Don’t hurry through this process, though; it will take several days to finish all steps depending on how large an area needs treatment.
Can you use wood for shower walls?
You can use wood as the shower walls if you seal them properly.
What type of wood is used for shower walls?
Most bathroom shower walls are made of fiberglass that is waterproof. However, some may be wood paneling or concrete board. If you’d like to use an existing wall for your new shower enclosure but it isn’t water-resistant enough, this blog post will help you learn how to make it more suitable for a wet environment.
Does linseed oil make wood waterproof?
Linseed oil is inherently hydrophobic (water-repellent). When linseed oil is used as a wood finish, on the other hand, it may be susceptible to water damage [6].
Useful Video: How to Waterproof Wood for Bathroom?
References:
- https://www.inspirationspaint.com.au/articleview/240/what-is-the-difference-between-stain-and-stain-varnish-
- https://www.fromtheforest.com/blogs/fromtheforest/floor-cupping-what-you-need-to-know
- https://www.americanpoleandtimber.com/salt-killed-wood-in-marine-structures/
- https://knowledgecenter.mearthane.com/polyurethanewaterproof
- https://www.mbfgfiles.co.uk/docs/g4_dampseal_tech.pdf
- https://vermontwoodsstudios.com/content/linseed-oil